DEPRECATED
Themis now autodiscovers the temperature and humidity sensors operating on the 169 Mhz range and using the wireless Mbus protocol. Nevertheless, at the beginnings, we had to pair the receiver with the sensors. Once the pairing has been successfully completed, the datas from the various transmitters are available in real time, via a query of the receiver in Modbus RTU format. This guide covers the pairing process, which is now deprecated. This is just for general knowledge.
Create the ecosystem
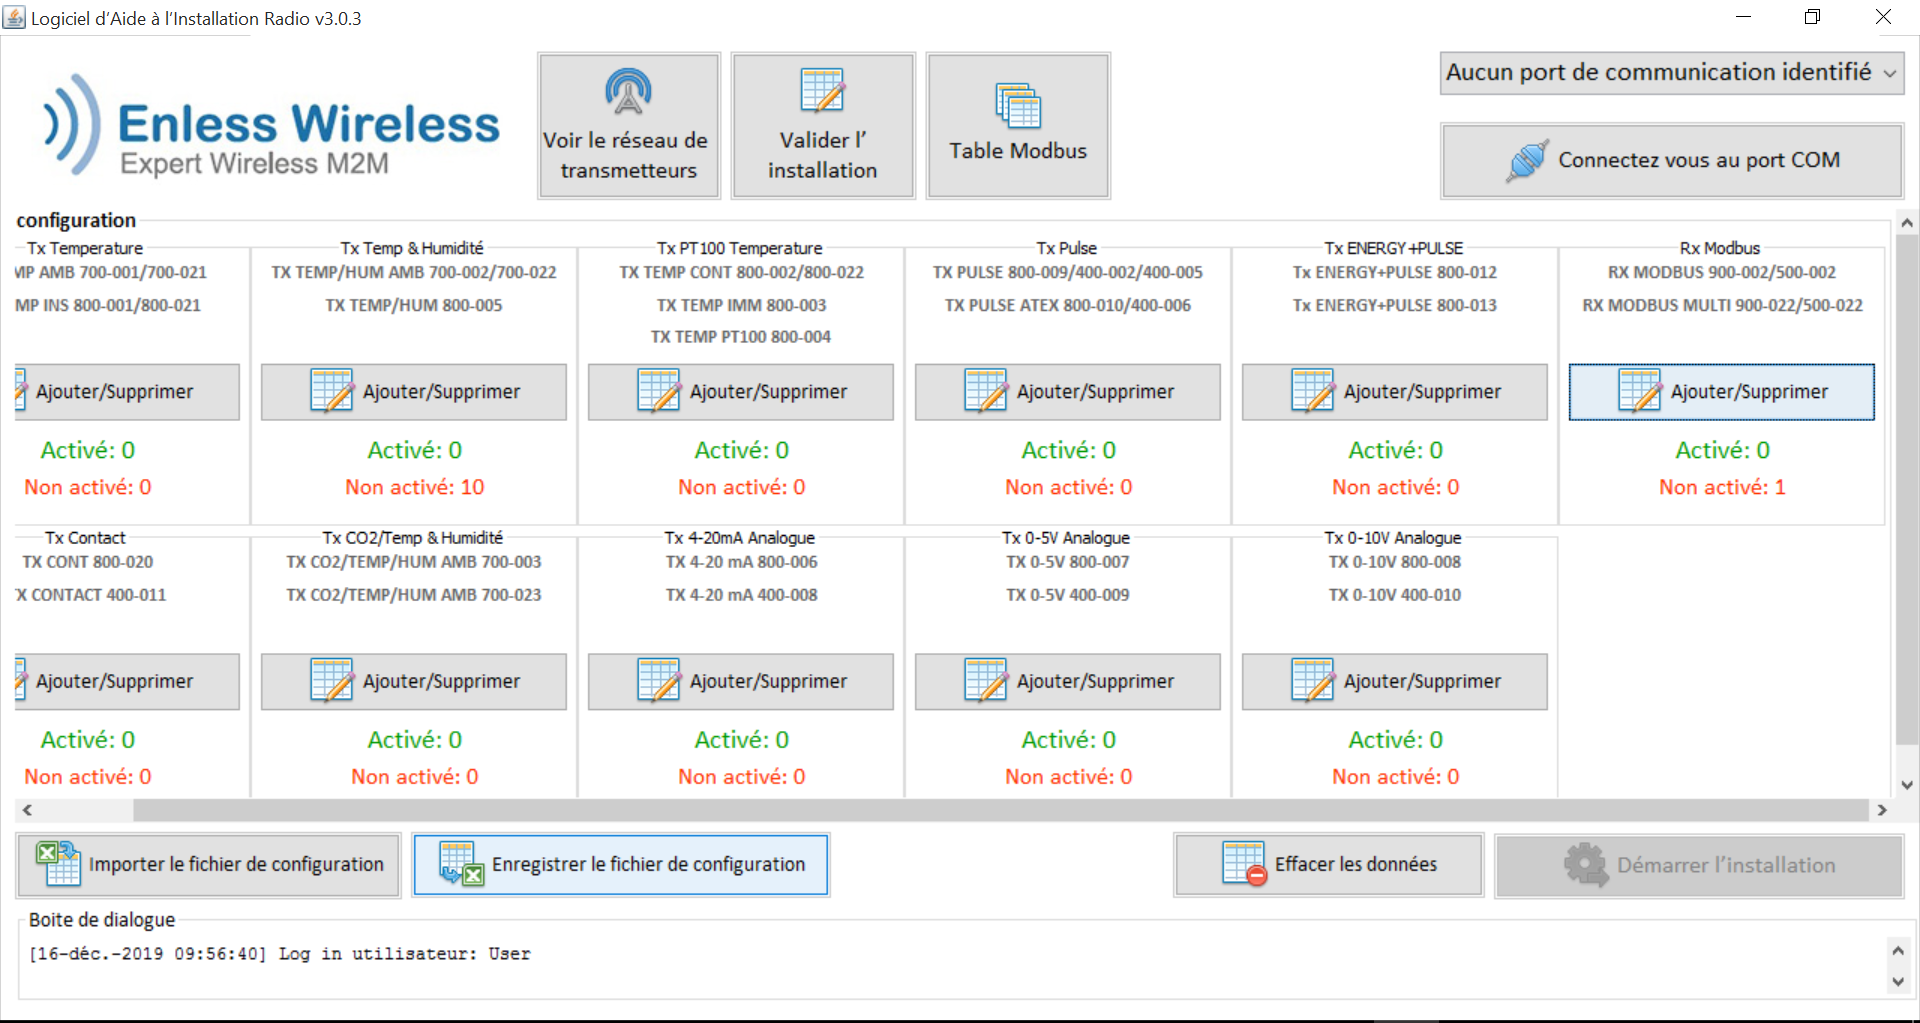
Once you receive the receiver and its transmitters, use the Enless Field software AIR to create the ecosystem
Assuming you are using a windows 10 machine and even if your machine is 64 bits but a bit old :
- install the 32 bits version of the jre
- install the 32 bits of AIR
At this stage, you do not need to have the hardware connected to the computer on which the software is installed
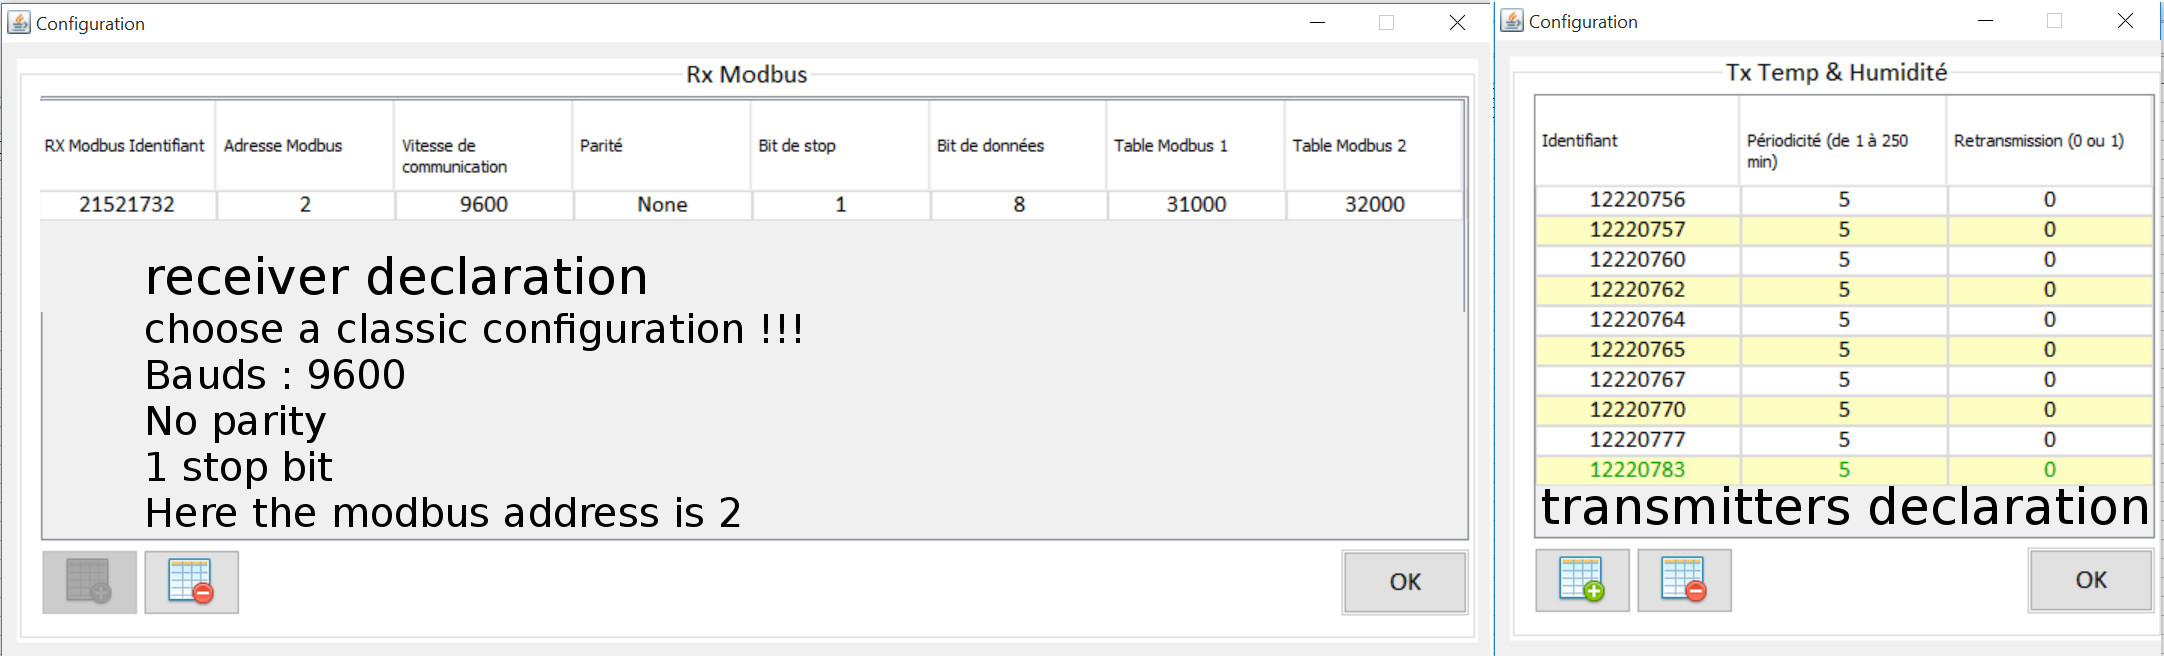
Save the csv file (smart if you need to change the periodicity in the future)
Pairing process
Usually, the receiver is automatically recognized but on some old machines, you may need to do it manually
The drivers can be found on the ftdi website, as the lastest windows M2xx drivers or on the main D2XX page
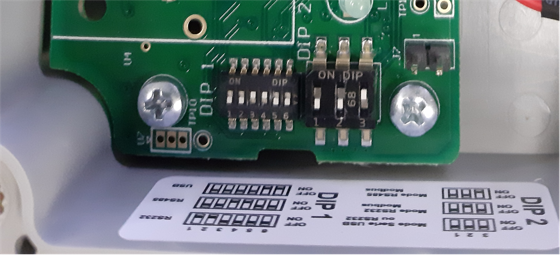
Phase 0 : identify the DIPS on the receiver
Phase 1 : transmitters installation
On the receiver, position the switches as follow :
- DIP1 : 1,2,3,4 OFF 5,6 ON
- DIP2 : 1,2,3 OFF
Power the receiver with a 12V alimentation
Plug the receiver to the computer via USB
Load the csv file if needed
Connect to the receiver
[15-déc.-2019 20:14:47] Port série connecté COM9@19200
Start the installation
[07-janv.-2020 16:24:28] Démarrage de l’installation
Power one by one each transmitter
[07-janv.-2020 16:24:36] Demande d'installation pour TX TEMP HUM 12220756 RSSI:-28,0dBm
[07-janv.-2020 16:24:38] Acquittement en phase d'installation 12220756 RSSI:-27,0dBm
[07-janv.-2020 16:24:39] Niveau RSSI en phase d'installation 12220756 RSSI:-29,0dBm
[07-janv.-2020 16:24:41] Niveau RSSI en phase d'installation 12220756 RSSI:-27,0dBm
[07-janv.-2020 16:24:43] Niveau RSSI en phase d'installation 12220756 RSSI:-28,0dBm
[07-janv.-2020 16:24:45] Niveau RSSI en phase d'installation 12220756 RSSI:-41,0dBm
[07-janv.-2020 16:24:47] Niveau RSSI en phase d'installation 12220756 RSSI:-40,0dBm
[07-janv.-2020 16:24:49] Succès de l'installation TX TEMP HUM 12220756 RSSI:-38,0dBm
On each transmitter, L1 should blink in red during communication with receiver
Stop the installation
[07-janv.-2020 16:42:24] Arrêter l’installation
The sensors should now appear as activated
Phase 2 : receiver installation and pairing with transmitters
Unplug and poweroff the receiver
On the receiver, position the switches as follow :
- DIP1 : 1,2,3,4 OFF 5,6 ON
- DIP2 : 1,3 OFF 2 ON
Power the receiver with a 12V alimentation
Once the receiver powered, L5 should start blinking on it
As soon as L5 flashes, don’t waste time :
- plug the receiver to the computer via USB,
- connect the AIR software to the receiver
- start the installation
[07-janv.-2020 16:44:25] Port série connecté COM9@19200
[07-janv.-2020 16:44:30] Démarrage de l’installation
[07-janv.-2020 16:44:32] Demande d'installation pour Receiver 21520922
[07-janv.-2020 16:44:38] Acquittement en phase d'installation Receiver 21520922
[07-janv.-2020 16:44:44] Succès de l'installation Receiver 21520922
Stop the installation
[07-janv.-2020 16:44:59] Arrêter l’installation
The receiver should now appear as activated
Phase 3 : switching the receiver in RS485 exploitation mode
Unplug and poweroff the receiver
On the receiver, position the switches as follow :
- DIP1 : 1,2,5,6 OFF 3,4 ON
- DIP2 : 1,2 OFF 3 ON
SUMMARY
| Phase | transmitters installation | receiver installation |
|---|---|---|
| DIPS on the receiver | - DIP1 : 1,2,3,4 OFF 5,6 ON - DIP2 : 1,2,3 OFF |
- DIP1 : 1,2,3,4 OFF 5,6 ON - DIP2 : 1,3 OFF 2 ON |
| sequence | Load the csv file if needed Power the receiver with a 12V alimentation Plug the receiver to the computer via USB Connect to the receiver Start the installation Power one by one each transmitter Stop the installation Unplug and poweroff the receiver |
Load the csv file if needed Power the receiver with a 12V alimentation Once the receiver powered, L5 should start blinking on it Plug the receiver to the computer via USB Connect to the receiver Start the installation Stop the installation Unplug and poweroff the receiver |
| results | transmitters activated | receiver activated |
Each sequence can be performed independently
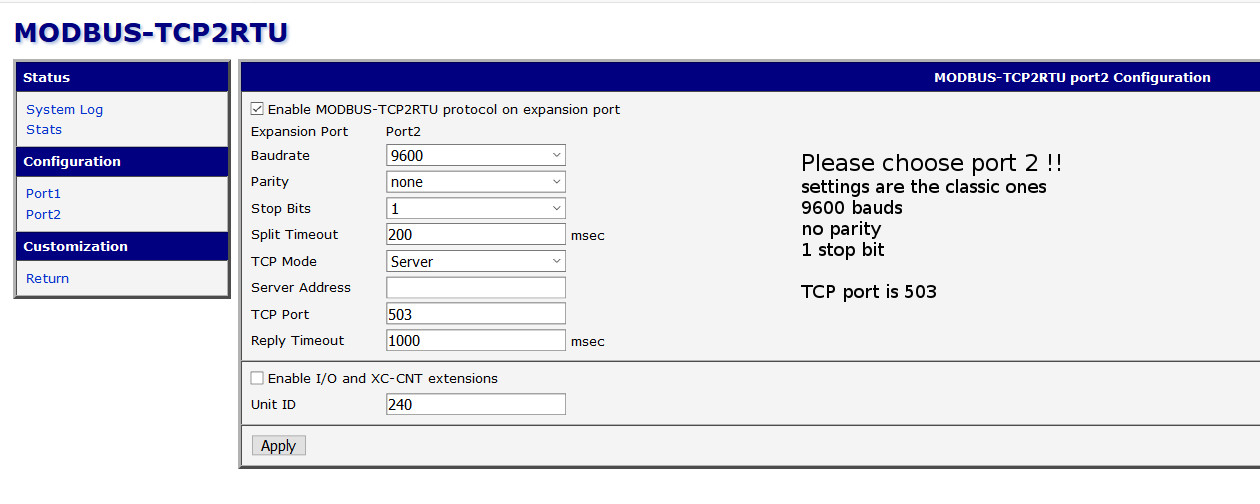
Routeur configuration
Tested with Smarflex SR303 and ICR3200 from Advantech
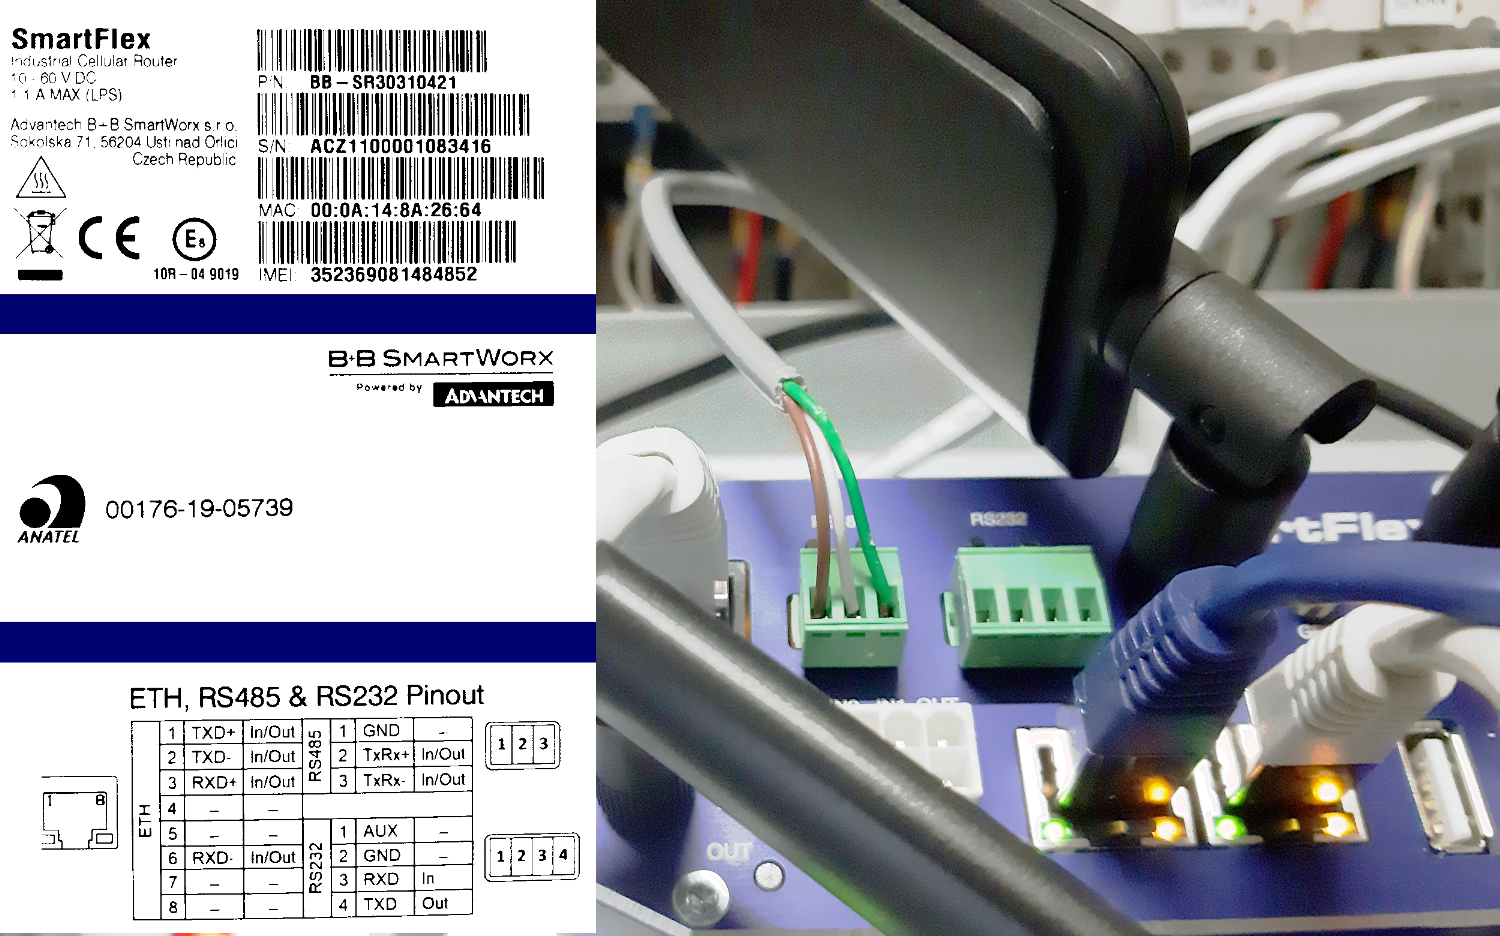
Physical connexions
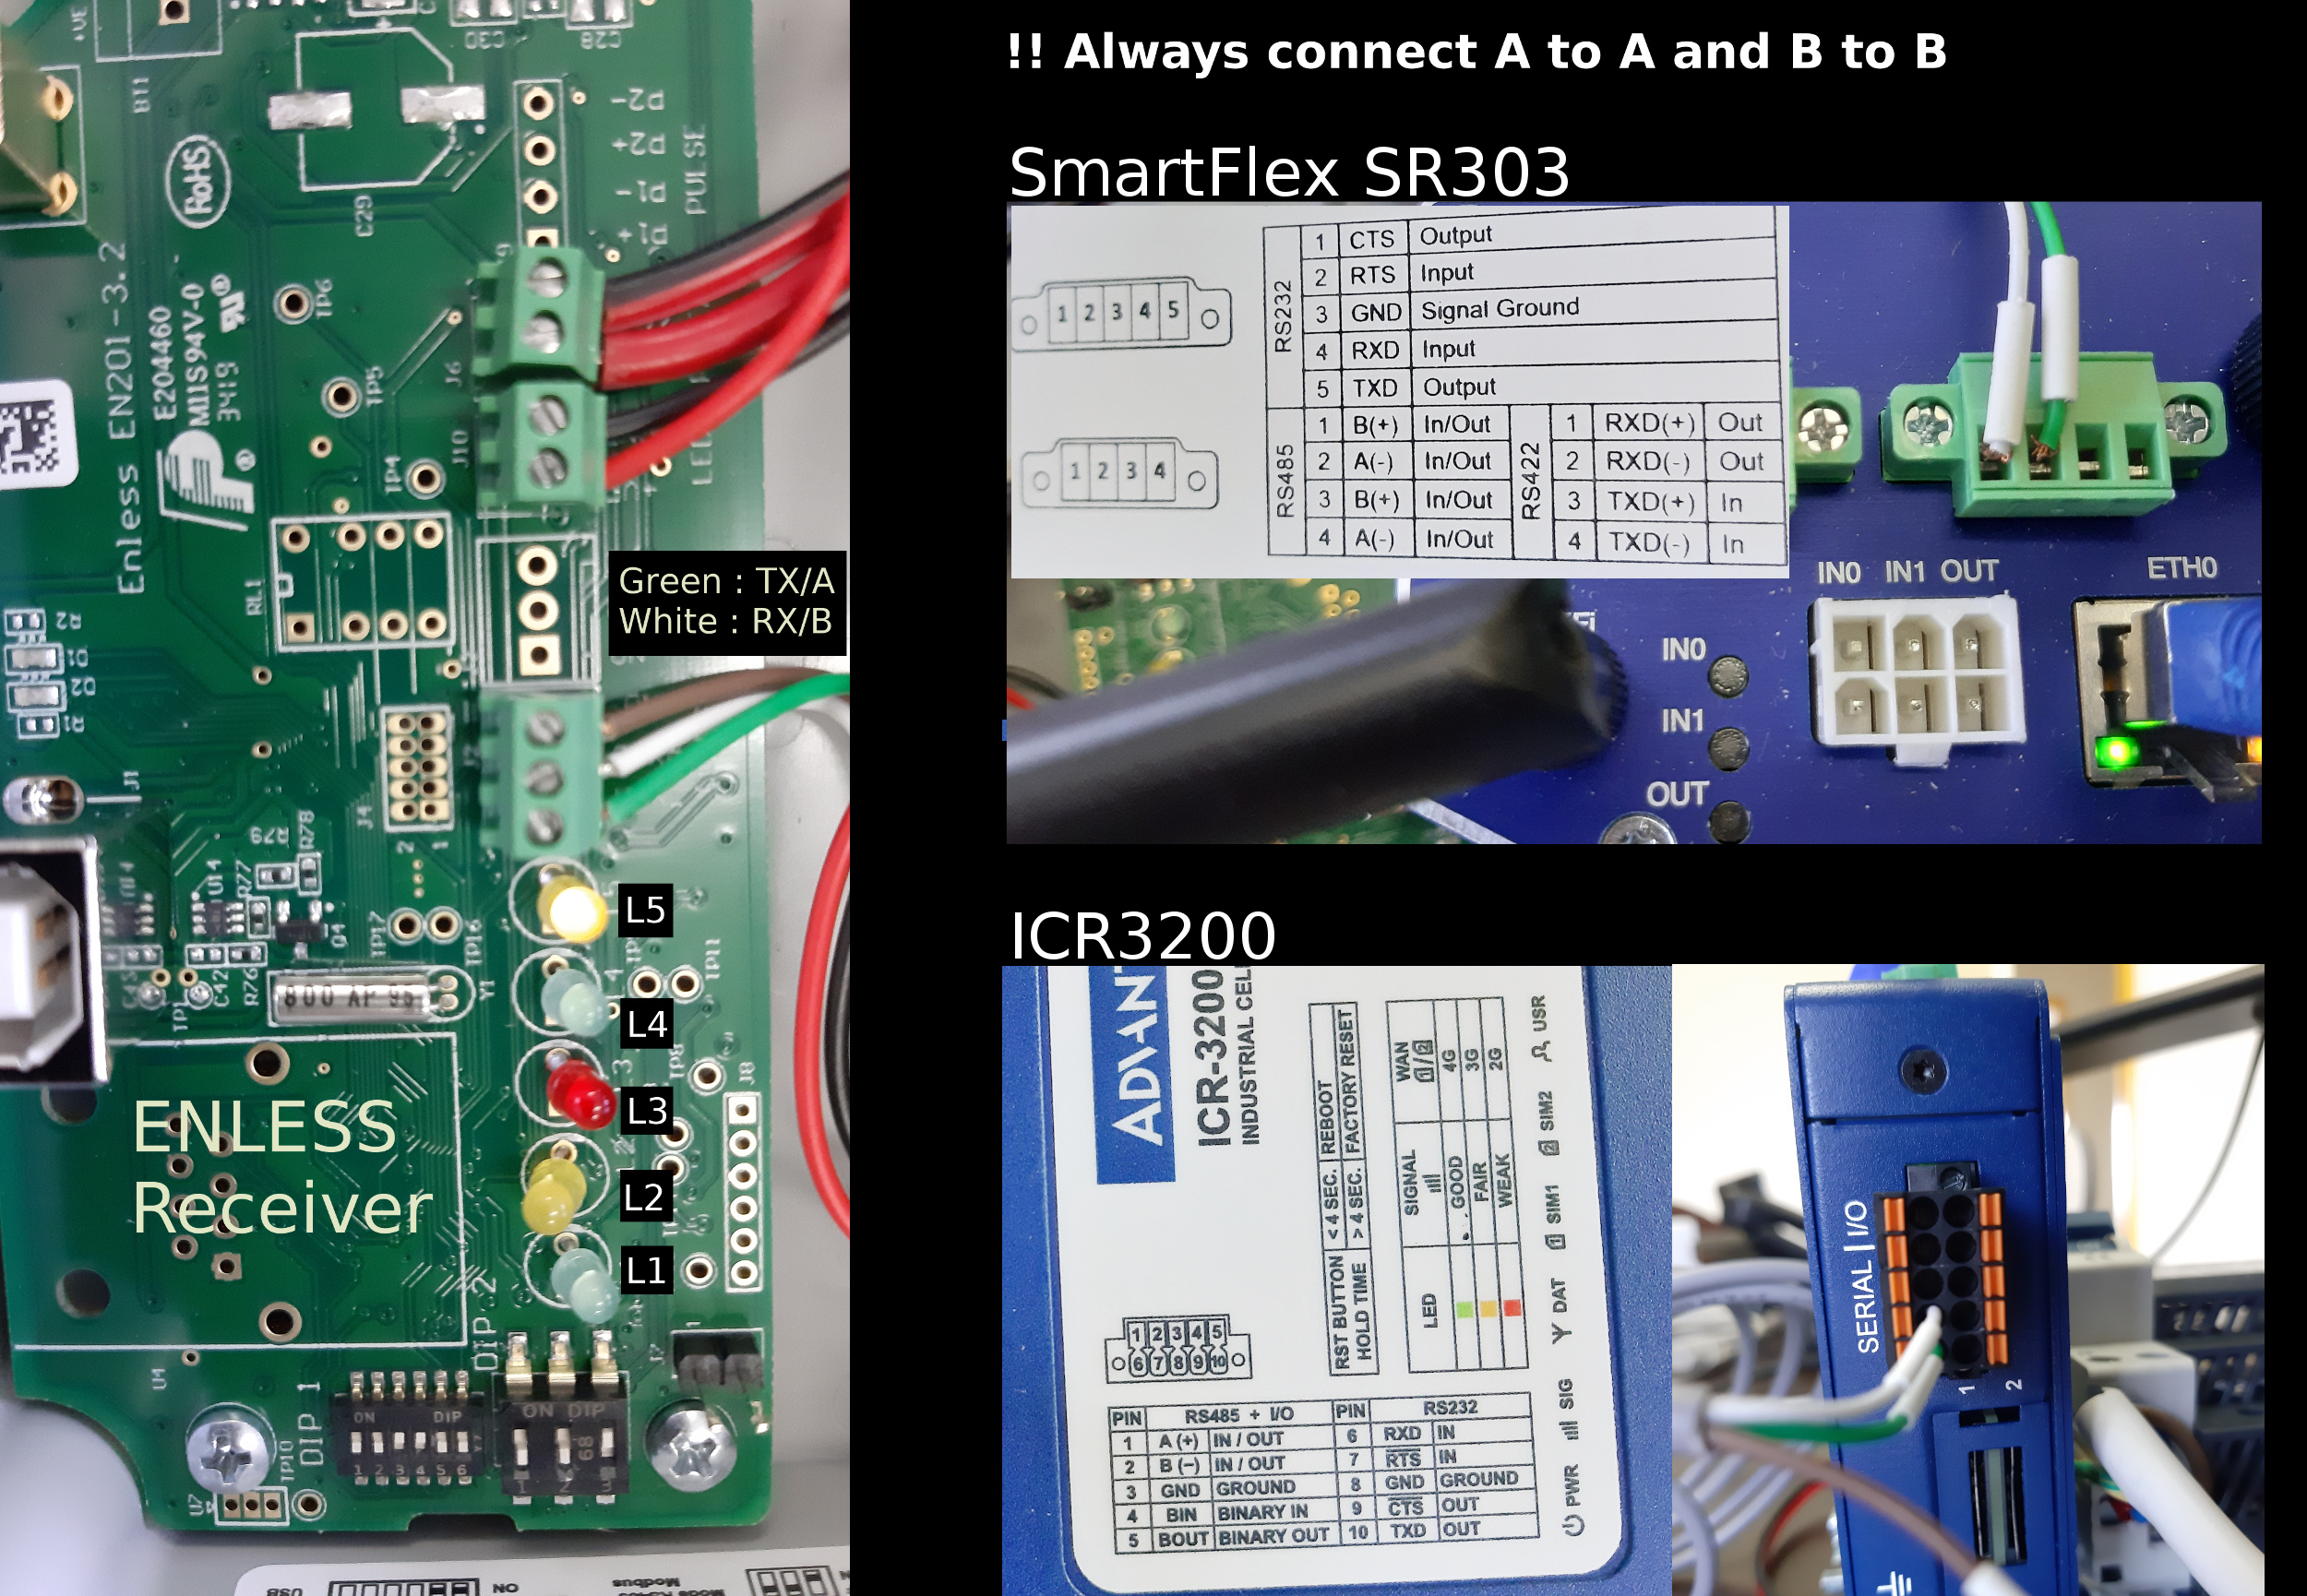
The above illustration was made using an ISR 3200 router and a smartflex SR303 router with 2 ethernet ports. There is a variant of the SR303 with 3 ethernet ports. The RS485 connectivity is a bit different.
Emonhub configuration
declare the interfacer
[interfacers]
[[ModbusTCP]]
    Type = EmonModbusTcpInterfacer2
    [[[init_settings]]]
        modbus_IP = 192.168.1.1 # ip address of client to retrieve data from
        modbus_port = 503 # Portclient listens on
        fCode = 3 # optional if using function code 3 (read holding registers) - with fCode = 4, the interfacer will read input registers
    [[[runtimesettings]]]
        nodeIds = 23,24
        pubchannels = ToEmonCMS,
        # time in seconds between checks, This is in addition to emonhub_interfacer.run() sleep time of .01
        interval = 60
configure some nodes
[[23]]
    nodename = TRH12220020
    [[[rx]]]
       names = SlaveType,Timer,RSSI,serHigh,serLow,temp,hum
       registers = 31048,31049,31050,31051,31052,31053,31054
       datacode = H
       unitId = 2
       scales = 1,1,0.5,1,1,0.1,0.1

[[24]]
    nodename = CO218251004
    [[[rx]]]
        names = SlaveType,Timer,RSSI,serHigh,serLow,co2,temp,hum
        registers = 31092,31093,31094,31095,31096,31097,31098,31099
        datacode = H
        unitId = 2
        scales = 1,1,0.5,1,1,1,0.1,0.1